
Wednesday, September 2, 2009
A Little Love Card
See... I can make cards! I just don't make them as often as I scrap. Lots of embossing here and some glossy cardstock. This was made for last week's splitcoast stampers card sketch challenge.


Tuesday, September 1, 2009
So Behind...
I'm so behind in posting my creations. I did some scrapping last week and forgot to post it.
Here's the first one. It was primarily prompted by the ScrapSaturday challenge blog to scrap my scrappy place. From there, I encorporated this week's splitcoast technique and color challenges.
The technique is masked frames. Basically, you put a mask in the middle and stamp around it to create a frame. I have two frames on this layout: a large square one behind the entire layout on the background and one on the stamped embellishment at the top of the page.
Other stamping of note: The top embellishment, the title letters, and the brad at the bottom of the page are all embossed with a really pretty "valententines" glitter embossing powder which has a mix of light pink and dark pink as well as the glitter. It is gorgeous in real life.

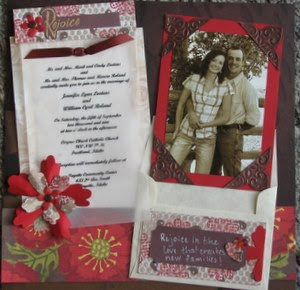
This layout began as a response to last weeks split coast color and technique challenges. This invite has been sitting on my desk for a while and when I saw the color challenge (real red, chocolate, and kraft), I new this was the perfect combo for this invite that I recieved for a cousing of mine.
I stamped the paper with the grid technique that was this month's technique challenge. I didn't have any magic mesh, so I used some "grid" ribbon I had. I painted it with white paint and "stamped" it onto the paper, Then I stamped the flowers and leaves in red and chocolate craft ink over the top of the grid. Then I cut it up to use on the layout... under the title... on the envelope under the journaling... and die cut as a flower in my layered flower (who need prima when you have a big shot?) The photo corners are cuttlebug embossing folders that I cut out and cut in half... then sprayed with glimmer mist for that little extra bling. That little heart is the stamped paper cut out with dimentional adhesive, then a little punched flower with a touch of bling.
 A blank layout. This one kind of gave me fits for a while. It was in response to the featured stamper and the scrapbooking inspiration challenges. I embossed the suns and the title letters with a cool pepper colored embossing powder. Then used adarondak pads and a sponge to give it that lovely glow. I love that pressed flower sticker from my stash. It fits so perfectly. Hopefully the pictures for this one will come soon.
 I made some cards also... I'll upload them tomorrow. I love these challenges because they force me to get creative with my stamping on layouts and soon I've found more and more ways to encorporate stamping into my layouts that make them totally unique and totally me. That's why I love stamping... it gives my layouts something that prefab die cut stickers just can't.
Here's the first one. It was primarily prompted by the ScrapSaturday challenge blog to scrap my scrappy place. From there, I encorporated this week's splitcoast technique and color challenges.
The technique is masked frames. Basically, you put a mask in the middle and stamp around it to create a frame. I have two frames on this layout: a large square one behind the entire layout on the background and one on the stamped embellishment at the top of the page.
Other stamping of note: The top embellishment, the title letters, and the brad at the bottom of the page are all embossed with a really pretty "valententines" glitter embossing powder which has a mix of light pink and dark pink as well as the glitter. It is gorgeous in real life.

This layout began as a response to last weeks split coast color and technique challenges. This invite has been sitting on my desk for a while and when I saw the color challenge (real red, chocolate, and kraft), I new this was the perfect combo for this invite that I recieved for a cousing of mine.
I stamped the paper with the grid technique that was this month's technique challenge. I didn't have any magic mesh, so I used some "grid" ribbon I had. I painted it with white paint and "stamped" it onto the paper, Then I stamped the flowers and leaves in red and chocolate craft ink over the top of the grid. Then I cut it up to use on the layout... under the title... on the envelope under the journaling... and die cut as a flower in my layered flower (who need prima when you have a big shot?) The photo corners are cuttlebug embossing folders that I cut out and cut in half... then sprayed with glimmer mist for that little extra bling. That little heart is the stamped paper cut out with dimentional adhesive, then a little punched flower with a touch of bling.
 A blank layout. This one kind of gave me fits for a while. It was in response to the featured stamper and the scrapbooking inspiration challenges. I embossed the suns and the title letters with a cool pepper colored embossing powder. Then used adarondak pads and a sponge to give it that lovely glow. I love that pressed flower sticker from my stash. It fits so perfectly. Hopefully the pictures for this one will come soon.
 I made some cards also... I'll upload them tomorrow. I love these challenges because they force me to get creative with my stamping on layouts and soon I've found more and more ways to encorporate stamping into my layouts that make them totally unique and totally me. That's why I love stamping... it gives my layouts something that prefab die cut stickers just can't.
 Saturday, August 22, 2009
Whimpsical Halloween
Halloween Whimsey!
I did this one in reponse to splitcoaststampers regular Saturday inspiration challenge. I was inspired by these moth killers: http://www.pylones.com/famille.php?fid=349 They are made by a company called Pylones.
 It's all pretty straight forward, really, except for my little bats. For these, I hand drew a template, then traced it on scrap paper. The bodies are each heavy cardstock. The wings are lighter weight specialty paper from club scrap (some vellum, some metallic, some crape). I stamped the bodies and wings with a glue pad and then flocked and glittered them. Then I used pens to make the eyes, mouthes and dots on the ears.

I'm really in love with this layout. Those bats are darn cute and they were fun to make (although I was wanted a die cut near the end of the hand cutting). I don't generally do a lot of paper piecing, but this one was really fun. Hope you like it. Stampin smiles!
I did this one in reponse to splitcoaststampers regular Saturday inspiration challenge. I was inspired by these moth killers: http://www.pylones.com/famille.php?fid=349 They are made by a company called Pylones.
 It's all pretty straight forward, really, except for my little bats. For these, I hand drew a template, then traced it on scrap paper. The bodies are each heavy cardstock. The wings are lighter weight specialty paper from club scrap (some vellum, some metallic, some crape). I stamped the bodies and wings with a glue pad and then flocked and glittered them. Then I used pens to make the eyes, mouthes and dots on the ears.
I'm really in love with this layout. Those bats are darn cute and they were fun to make (although I was wanted a die cut near the end of the hand cutting). I don't generally do a lot of paper piecing, but this one was really fun. Hope you like it. Stampin smiles!
Saturday, June 20, 2009
Maze Book
Stamping Greetings...
My Autistic Son is making us crazy today. Really crazy. How appropriate that I spent a couple of hours today working on this cute little maze book. I got the pattern off of an old TVWeekly Webisode with Trisha Morris from Club Scrap... the maze book. I used up a bunch of scraps and extra tags from the concrete jungle kit to make it... along with some scraps of basic grey paper, and some small pieces of some of the most luscious paper I own... some handmade paper from the club scrap citrus kit. I actually cut into it recently so I had the scraps laying on my table. I find that scraps get used up if I leave them sitting on my table.
Anyway, here's the cover of the book. I made the "button" out of a bead from the kit and some wire. I stenciled on the flowers with Adirondack Denim (used throughout the book). Then some dimensional glue and bling... and a sticker from the kit.
 My husband has a special talent... he takes truly AWFUL pictures... Really. I finally found a use for one.
 A page about reading... I read quite a bit. At least an hour a day.

Next comes gardening. My new home in the country is sure needing a LOT of gardening and yard work. Good thing I enjoy it!

Would we all do paper crafting if it didn't lower our blood pressure... I used a picture of the other mini-book I made recently. I resolved to make more minibooks in the future. I LOVE this format. It really releases my creativity.

Next comes tea. Ninety percent of what I drink every day is some form of tea.
 I love critters... and we have a lot of them. Three dogs, a cat, 2 horses, a tree frog, and about 30 fish. Horses are #1 but they can't cuddle with you in bed... that's why they made small dogs.

There is my Mini-book on the things that help me to "Exhale".
My Autistic Son is making us crazy today. Really crazy. How appropriate that I spent a couple of hours today working on this cute little maze book. I got the pattern off of an old TVWeekly Webisode with Trisha Morris from Club Scrap... the maze book. I used up a bunch of scraps and extra tags from the concrete jungle kit to make it... along with some scraps of basic grey paper, and some small pieces of some of the most luscious paper I own... some handmade paper from the club scrap citrus kit. I actually cut into it recently so I had the scraps laying on my table. I find that scraps get used up if I leave them sitting on my table.
Anyway, here's the cover of the book. I made the "button" out of a bead from the kit and some wire. I stenciled on the flowers with Adirondack Denim (used throughout the book). Then some dimensional glue and bling... and a sticker from the kit.
My husband has a special talent... he takes truly AWFUL pictures... Really. I finally found a use for one.

First way to relax... riding my horse.
A page about reading... I read quite a bit. At least an hour a day.Next comes gardening. My new home in the country is sure needing a LOT of gardening and yard work. Good thing I enjoy it!
Would we all do paper crafting if it didn't lower our blood pressure... I used a picture of the other mini-book I made recently. I resolved to make more minibooks in the future. I LOVE this format. It really releases my creativity.
Next comes tea. Ninety percent of what I drink every day is some form of tea.
 I love critters... and we have a lot of them. Three dogs, a cat, 2 horses, a tree frog, and about 30 fish. Horses are #1 but they can't cuddle with you in bed... that's why they made small dogs.
 Finally, sewing relaxes me. I enjoy the steady rhythm of sewing quilt blocks together. Mindless yet completely creative. Very relaxing.

There is my Mini-book on the things that help me to "Exhale".
Stampin Smiles!
Friday, June 19, 2009
Concrete Jungle-a-thon
Yes, I used it all. There are no embellishments... no 12x12 sheets... hardly any fibers... and only about 1/3 of the stickers, tags, and cutouts left. That is my goal... empty that box. You will see that I'm an embellisher... so I went to LSS to supplement my box. I bought a couple of sheets of pattern paper from basic grey and bo bunny... some sickles and black bling... some black felt flowers... a sheet of basic grey rub-ons... and a cheap $1 stamp set. You will probably see those things throughout this posting.
My first project was to create the little book described in the scrap wrap. It was a very cute little project. I modified it a bit to give it a spine. I used some scrappers twine to tie the pages in so they don't accordion out. Also to add some beaded bling.
 Here's the interior view of the book. I added tags also, which does make the book stick out of the little box container a bit. But, I kind of like that. And I know I like tags!
 I had run out of photos by the end of my adventure, so I made one blank layout. I modified one of the ABLS layouts in the scrap rap for this one.
Here's my cute nephews. That paper is basic grey and MME. I did a version of that ribbon technique from the scrap rap here. Stamps are Autumn Leaves, stamped with white, and outlined with a glaze pen.

This is one of my favorite layouts. I made the title block with a piece of chipboard covered with that shiny paper and stamped with staz-on... those are a club scrap alpha and an old stampin up stamp. The little heart pendant came from mys stash (must use the stash!)

This is NOT the most attractive picture of my daughter. She licks her face compulsively sometimes and this causes an ugly rash. It was in full flower at the time. But it was an important picture because of how our sweet kitty Aimee had attached herself to my daughter. Unfortunately, Aimee was subsequently killed on the road. It makes this layout bittersweet. But we all loved Aimee deeply so it was important to do. That cog paper is bo bunny and it was just so appropriate for the urban jungle theme. I used it up too. Aimee was kind of a princess of a cat so I tried to convey that with the layout.

This is a very favorite picture of my kiddos. It was taken last December, if you can believe it... for my son's birthday party. It was unseasonably warm that day. I spent a while on this layout working on the beading and embellishments. I stamped that little tag we got in the embellishments pack and embossed it. The crown with some bling on the tag... I love the way the pattern papers frame the photo.

Love this picture of my dad reading and my daughter. I don't remember the manufacturer of this pattern paper. I love that stamp made by angel company that I used on the tag. I have used it a lot over the last year. I colored it with a glaze pen.
 Jack turned 5 this year. These are his official 5-year-old photos scrapped. I stamped those circles then decided they needed a little glitter glue to pop. That punch is a Martha Stewart border one.
Pretty much all concrete jungle, except for the rub-on. More of those autumn leaves alpha stamps. I like them, but clear stamps just don't stick well. I wonder how long they will last.

My son has some cute ways of talking. For the longest time he said "strom pooper" for storm trooper. He is obsessed with star wars. That stamp is from Scrapgoods...
 I didn't stamp on this one, but I embossed chipboard with a "malachite" colored powder.
Here's Jack's 5th birthday. The "birthday" is a rub-on. I put some glitter glue in the openings of the chipboard.

Well, as you can see, concrete jungle is almost history. I wasn't super excited about the papers when I got them... a little too industrial for my tastes. I really don't care for the girl and boy signs. But I loved the colors. That was cool. And I have to remind myself that in reality, most of the patterns get covered with pictures anyway... What I did love is that club scrap included a broad variety of textures of papers. That was something I had always wanted before when I was a member. This was an infinitely usable kit and I will enjoy the layouts I have made for a long time.
Honestly, I have found that you can enjoy the papers far more if you actually use them. In the stash, they just get forgotten. And then purged at some later mystery time. Don't purge your favorites. Use them and enjoy them. There are ALWAYS new papers come on the horizon that are as cool or cooler.
Stampin Smiles....
Thursday, June 18, 2009
Scrappin Crazy
Greetings! It's been FOREVER since I've updated. I know that. Moving. Working full time. Gardening on an acre of weed infested chaos. Horses. New puppies. Special Needs Kids. 2 of them. Need I say more?
I finally got my scrapping place set up in the new house and just went of a creative frenzy. My first piece was to scrap this sweet photo of my nephew's christmas picture. Am I the only one who scraps all those pics we are given in the mail at Christmas? I like using christmas products!
I'm stamping more and more on my photos now. My collection of Staz-On has grown exponentially this last year (gotta love all those yummy new colors). Stamped and flocked his name too. With glitter flock. Looks cooler IRL. I kind of like how the N is upside down.

I bought this pattern paper for this sun shine. So of course I had to fussy cut it and totally trace every cool line with my secura glitter pen.
 Here's the layout in it's entirety. That piece of the title was also part of the pattern paper. I stamped a lot with my brilliance white pad, which I had forgotten is very opaque on photos but not so opaque on paper. Next time I'll use that stampin up one (messy, but the most opaque on paper I've found). Brilliance is ideal for stamping on pics though because it dries well. I traced all those letters and colored in the flowers with a secura glaze pen. Again, cooler IRL.
 Another one of those Christmas photos in the mail. This time my other sister's boys (my daughter is the ONLY girl in this generation in our family). Those flowers were made with uber cheap sequins I got out of the Jo Ann dollar spot. I folded them in half for dimentional effect, added a paper punched flower in the center, then yellow bling, and some martha punched vines from scrap paper. Too bad that when I finished it was really '08. Doh! I'll have to write an extra little journaling to that effect somewhere on this layout because I seriously doubt I'm going to fix the '07 without some SERIOUS tagging...

I LOVED this picture of my sister's family. It deserved some of my most favorite paper... something I had been hording for YEARS... namely that gorgeous club scrap handmade paper. From the citrus kit oh so many years ago. I love how that wavy pattern paper compliments the theme. And I used stickers for the title! I have so many letter stickers that just rot in a pouch. Seriously. I need to just bust them out and force myself to use them up. They are so easy to use. I used poppin pastel for that swirl on the background cardstock.

Well, I hope you enjoyed. I actually just rejoined club scrap and will have about 12 layouts to show you from the new kit soon.... but I need to go to bed tonight. Maybe tomorrow I will get those uploaded. Stampin smiles!
I finally got my scrapping place set up in the new house and just went of a creative frenzy. My first piece was to scrap this sweet photo of my nephew's christmas picture. Am I the only one who scraps all those pics we are given in the mail at Christmas? I like using christmas products!
I'm stamping more and more on my photos now. My collection of Staz-On has grown exponentially this last year (gotta love all those yummy new colors). Stamped and flocked his name too. With glitter flock. Looks cooler IRL. I kind of like how the N is upside down.
I bought this pattern paper for this sun shine. So of course I had to fussy cut it and totally trace every cool line with my secura glitter pen.
 Here's the layout in it's entirety. That piece of the title was also part of the pattern paper. I stamped a lot with my brilliance white pad, which I had forgotten is very opaque on photos but not so opaque on paper. Next time I'll use that stampin up one (messy, but the most opaque on paper I've found). Brilliance is ideal for stamping on pics though because it dries well. I traced all those letters and colored in the flowers with a secura glaze pen. Again, cooler IRL.
 Another one of those Christmas photos in the mail. This time my other sister's boys (my daughter is the ONLY girl in this generation in our family). Those flowers were made with uber cheap sequins I got out of the Jo Ann dollar spot. I folded them in half for dimentional effect, added a paper punched flower in the center, then yellow bling, and some martha punched vines from scrap paper. Too bad that when I finished it was really '08. Doh! I'll have to write an extra little journaling to that effect somewhere on this layout because I seriously doubt I'm going to fix the '07 without some SERIOUS tagging...
I LOVED this picture of my sister's family. It deserved some of my most favorite paper... something I had been hording for YEARS... namely that gorgeous club scrap handmade paper. From the citrus kit oh so many years ago. I love how that wavy pattern paper compliments the theme. And I used stickers for the title! I have so many letter stickers that just rot in a pouch. Seriously. I need to just bust them out and force myself to use them up. They are so easy to use. I used poppin pastel for that swirl on the background cardstock.

Well, I hope you enjoyed. I actually just rejoined club scrap and will have about 12 layouts to show you from the new kit soon.... but I need to go to bed tonight. Maybe tomorrow I will get those uploaded. Stampin smiles!
Wednesday, December 17, 2008
Snow Dog
Here's a layout featuring our new papillion puppy, Doby. He is just 6 months old. This weekend, it snowed heavily and we went out with the kids to make a snow man. Doby went mad with delight, running and snuffling snow and just having a great old time. That deserved a layout so that when he's a grumpy old man sleeping under the covers (like Winny there in the picture), we can remember these sweet puppy days.

This layout was done to satisfy 3 challenges on splitcoast... the color challenge (grey, baha breeze, Kiwi kiss...), a card layout challenge, and a challenge to make a "tag punch star" technique. I don't have that punch so I used a scallop circle punch and a plain circle punch to do the same. That was a fun way to do this technique and I think it turned out really cool. I love those velum scraps from club scrap (probably going to have to resub to them eventually if I start to run out of scraps hahaha... run out!)
Used a lot of glitter glue on this one. And some way cheap snowflake sequins that I got out of the Joann's dollar spot.
Subscribe to:
Posts (Atom)